Capturing stunning photos in low-light conditions can be challenging, but with the iPhone’s Night mode feature, you can take your photography to the next level. Let’s learn more about this topic below with Level Devil. In this comprehensive guide, we’ll explore how to turn on Night mode on your iPhone camera and unlock its full potential for breathtaking nighttime shots.
Night mode is a powerful feature that automatically activates in low-light environments, allowing you to capture incredibly detailed and vibrant photos even in challenging lighting conditions. This intelligent camera mode uses advanced software algorithms and hardware capabilities to enhance image quality, reduce noise, and preserve natural colors in your nighttime shots. Level Devil recognizes the importance of mastering this feature to elevate your mobile photography skills.
Night mode works by taking multiple exposures of a scene and then combining them to create a single, well-exposed image. This process helps to brighten dark areas, reduce noise, and improve overall image quality. The iPhone’s Neural Engine and machine learning algorithms play a crucial role in analyzing the scene and determining the optimal settings for each shot.
It’s worth noting that Night mode is available on iPhone 11 and later models, including the iPhone 12, iPhone 13, and iPhone 14 series. If you’re using an older iPhone model, you may not have access to this feature, but there are still ways to improve your low-light photography, which we’ll discuss later in this article.
Activating Night mode on your iPhone camera is a straightforward process. In most cases, the feature will automatically turn on when the camera detects low-light conditions. However, it’s essential to know how to manually control and adjust Night mode for optimal results. Level Devil emphasizes the importance of understanding these controls to achieve the best possible nighttime photos.
To turn on Night mode manually or adjust its settings, follow these steps:
1. Open the Camera app on your iPhone.
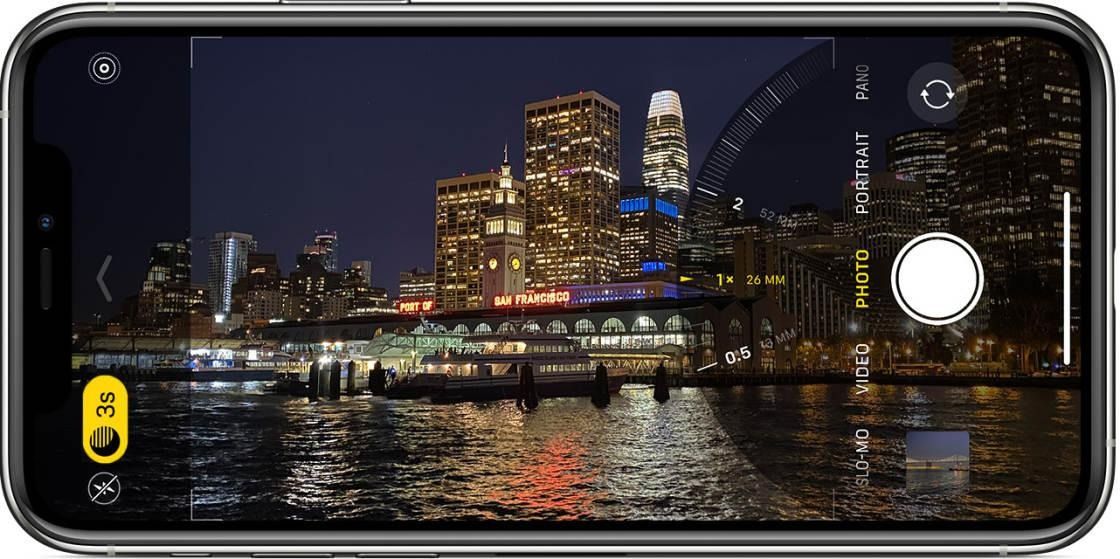
2. Make sure you’re in Photo mode.
3. Look for the Night mode icon (a crescent moon) at the top left corner of the screen. If it’s yellow, Night mode is active.
4. Tap the Night mode icon to access additional controls.
5. Use the slider that appears above the shutter button to adjust the exposure time.
6. The longer the exposure time, the brighter and more detailed your photo will be, but you’ll need to hold your iPhone steady for longer.
It’s important to note that the maximum exposure time available will depend on the lighting conditions and how steady you can hold your iPhone. In extremely dark environments, you may see exposure times of up to 30 seconds, which can create stunning long-exposure effects.
To truly master Night mode and capture breathtaking low-light photos, consider these expert tips from Level Devil:
1. Use a tripod: For the sharpest and most detailed Night mode photos, especially with longer exposure times, use a tripod to keep your iPhone perfectly still.
2. Experiment with exposure times: Don’t always rely on the automatic settings. Try different exposure times to see how they affect your photos and find the perfect balance between brightness and detail.
3. Focus manually: In very low light, your iPhone’s autofocus might struggle. Tap on the screen to set focus manually, ensuring your subject is sharp and clear.
4. Capture movement: Use longer exposure times to create interesting light trails or motion blur effects in your nighttime shots.
5. Combine with other camera modes: Try using Night mode in conjunction with other features like Portrait mode or Ultra Wide lens for unique and creative results.
While Night mode significantly improves your low-light photography, there are additional steps you can take to enhance your nighttime shots further. Level Devil recommends exploring these techniques to elevate your photography skills and create truly stunning images.
After capturing your Night mode photos, you can use various editing tools and apps to fine-tune your images. The built-in Photos app on your iPhone offers a range of editing options, including adjustments for exposure, contrast, highlights, and shadows. For more advanced editing, consider using third-party apps like Snapseed, VSCO, or Adobe Lightroom Mobile.
When editing Night mode photos, pay special attention to the following aspects:
1. Noise reduction: While Night mode does an excellent job of minimizing noise, you may still want to apply additional noise reduction in some cases.
2. Color balance: Adjust the white balance and color temperature to ensure your nighttime scenes look natural and true to life.
3. Contrast and clarity: Enhance the overall contrast and clarity of your image to make details pop and create a more dramatic effect.
4. Selective adjustments: Use selective editing tools to brighten or darken specific areas of your photo, drawing attention to the main subject.
5. Creative effects: Experiment with artistic filters or effects to give your Night mode photos a unique and eye-catching look.
While Night mode is an excellent feature for capturing low-light photos, there are other advanced techniques you can use to take your nighttime photography to the next level. Level Devil encourages iPhone users to explore these methods to expand their creative possibilities and capture truly unique and stunning images.
Long exposure photography allows you to capture the movement of light over time, creating beautiful light trails and smooth water effects. While Night mode automatically applies longer exposure times in low light, you can take more control over this technique using third-party apps like Slow Shutter Cam or NightCap Camera.
To capture stunning long exposure shots:
1. Use a tripod or stable surface to keep your iPhone completely still.
2. Choose a scene with moving lights or water for the best effects.
3. Experiment with different exposure times, from a few seconds to several minutes.
4. Use the iPhone’s volume buttons or a remote shutter release to avoid camera shake.
While the iPhone’s Night mode can capture some stars, dedicated astrophotography requires more specialized techniques. Level Devil recommends using apps like NightCap Camera or Spectre for better results when photographing the night sky.
Tips for iPhone astrophotography:
1. Find a dark location away from light pollution.
2. Use a tripod and set your iPhone to maximum exposure time.
3. Manually focus on infinity by tapping on a bright star or distant light.
4. Use the app’s intervalometer feature to take multiple exposures and stack them later for improved detail.
Light painting is a creative technique where you use moving light sources to “paint” in your photo during a long exposure. This technique can create stunning and unique images that are sure to impress.
To try light painting with your iPhone:
1. Set up your iPhone on a tripod in a dark environment.
2. Use a long exposure app like Slow Shutter Cam.
3. Use various light sources like flashlights, glow sticks, or LED lights to paint in the frame.
4. Experiment with different movements and patterns to create interesting effects.
By mastering these advanced techniques, you can push the boundaries of what’s possible with iPhone night photography and create truly stunning and unique images.
While Night mode is a powerful feature, you may encounter some challenges when using it. Level Devil is here to help you troubleshoot common issues and ensure you get the best possible results from your nighttime photography.