Screen recording on iPhone is a powerful feature that allows users to capture and share their device’s screen. Whether you’re creating tutorials, demoing an app, or troubleshooting, this feature can be extremely useful. Let’s learn more about this topic with Level Devil below with “How to Record Screen on iPhone: A Simple Step-by-Step Guide”.
The ability to record your iPhone’s screen has become an essential tool for many users, from content creators to tech enthusiasts. This feature, introduced with iOS 11, has evolved to become more user-friendly and versatile with each subsequent update. Whether you’re a new iPhone user looking to explore its capabilities or a long-time user seeking to optimize your device usage, understanding how to effectively use screen recording can significantly enhance your iPhone experience.
Screen recording on iPhone isn’t just about capturing what’s on your display; it’s about sharing experiences, creating content, and solving problems. For those considering buying an iPhone, this feature showcases the device’s versatility and user-friendly interface. Apple ecosystem users will find that screen recording integrates seamlessly with other Apple products and services, allowing for effortless sharing and collaboration. Even for those who simply love exploring technology, iPhone’s screen recording feature offers a playground for discovering hidden features and customizing your user experience.
In this comprehensive guide, we’ll walk you through the process of screen recording on your iPhone, from setting up the feature to editing and sharing your recordings. We’ll also explore some advanced tips and tricks to help you make the most of this powerful tool. Whether you’re using it for personal or professional purposes, by the end of this article, you’ll be well-equipped to capture, edit, and share your iPhone screen recordings with confidence.
Before you can start recording your iPhone’s screen, you need to ensure that the feature is properly set up and easily accessible. The process is straightforward, but it’s essential to follow these steps to avoid any hiccups when you’re ready to record.
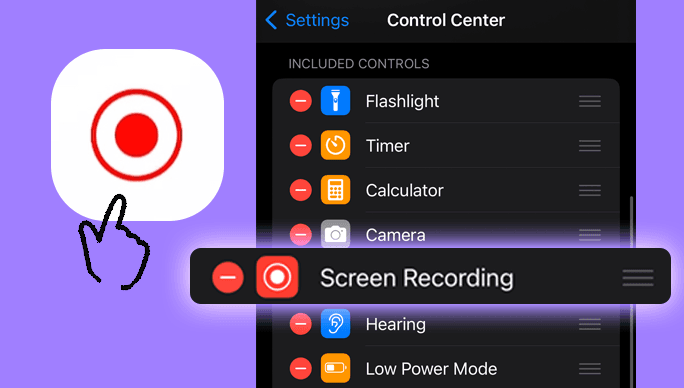
First, you’ll need to add the Screen Recording button to your Control Center. To do this, go to Settings > Control Center. Scroll down until you find “Screen Recording” under the “More Controls” section. Tap the green plus icon next to it to add it to your “Included Controls” list. You can rearrange the order of these controls by tapping and holding the three lines next to each item and dragging them to your preferred position.
Once you’ve added Screen Recording to your Control Center, you’re almost ready to go. However, it’s worth taking a moment to familiarize yourself with some of the settings and options available. For instance, you can choose whether you want to record audio along with your screen capture. This can be particularly useful if you’re creating a tutorial or explaining something in detail.
To access these options, simply open your Control Center (swipe down from the top-right corner on iPhone X or later, or swipe up from the bottom on earlier models), then press and hold the Screen Recording button. This will bring up additional options, including the ability to turn your microphone on or off during recording.
Now that you’ve set up screen recording on your iPhone, it’s time to learn how to use it. Starting a screen recording is a simple process, but there are a few things to keep in mind to ensure you capture exactly what you want.
To begin recording, open the Control Center and tap the Screen Recording button. You’ll see a three-second countdown, giving you time to navigate to the app or screen you want to record. Once the countdown ends, the recording will start automatically. You’ll know it’s recording because the time in the status bar will turn red, or on newer iPhone models with a notch, there will be a red indicator in the top-left corner.
While recording, you can navigate through your iPhone as usual. Everything that appears on your screen will be captured, including any notifications that pop up. Keep this in mind if you’re recording something you plan to share, as you may want to turn on Do Not Disturb mode to prevent any personal notifications from appearing in your recording.
To stop recording, you have two options. You can either tap the red time indicator at the top of the screen and confirm that you want to stop recording, or you can open the Control Center again and tap the Screen Recording button. Your iPhone will then process the video and save it to your Photos app.
It’s important to note that some apps may not allow screen recording due to copyright or privacy concerns. In these cases, your screen recording will continue, but the restricted content will appear as a black screen in your final video.
One of the most useful aspects of screen recording is the ability to include audio. This can be either the sound from your iPhone itself (like game audio or music playing in an app) or your own voice narration using your iPhone’s microphone.
To record with audio from your iPhone, simply start the screen recording as normal. The system sounds will be captured automatically. However, if you want to include your own voice narration, you’ll need to enable the microphone before you start recording.
To do this, open the Control Center and long-press on the Screen Recording button. You’ll see a microphone icon that says “Microphone Off.” Tap this to turn it on. Now, when you start recording, your iPhone will capture both the screen and your voice through the microphone.
Remember that when you’re recording with the microphone on, your iPhone will pick up all ambient sounds, not just your voice. Try to record in a quiet environment for the best audio quality.
Once you’ve captured your screen recording, you might want to edit it before sharing. Fortunately, iOS provides some basic editing tools right in the Photos app, allowing you to trim your video or add simple effects without needing to download additional software.
To edit your screen recording, open the Photos app and find your video. Tap “Edit” in the top-right corner. You’ll see a timeline of your video at the bottom of the screen. To trim the start or end of your video, tap and drag the arrows at either end of the timeline. You can also tap the play button to preview your edits.
If you want to add more advanced edits, such as text overlays or transitions, you might want to consider using a third-party video editing app. There are many options available on the App Store, ranging from simple and user-friendly to professional-grade editing suites.
Once you’re happy with your edited screen recording, it’s time to share it. iOS makes this process incredibly simple. From the Photos app, tap the share button (the square with an arrow pointing up). You’ll see a variety of sharing options, including Messages, Mail, and social media platforms. You can also save your video to Files or upload it to a cloud storage service.
If you’re sharing a large video file, you might want to consider using AirDrop to transfer it to another Apple device, or uploading it to a file-sharing service like Dropbox or Google Drive. These methods can be more reliable for larger files than trying to send them via email or messaging apps.
While the basic screen recording feature is straightforward, there are several advanced techniques you can use to enhance your recordings and make them more professional.
One useful trick is to use the AssistiveTouch feature to create a virtual button for starting and stopping your recordings. This can be particularly helpful if you find it awkward to use the Control Center while recording. To set this up, go to Settings > Accessibility > Touch > AssistiveTouch and turn it on. Then, customize the top-level menu to include Screen Recording.
Another advanced technique is to use screen recording in combination with other iOS features. For example, you can use the built-in screen mirroring feature to record content from another device on your iPhone. This can be useful for recording gameplay from an iPad or demonstrating how to use an Apple TV.
For those creating tutorial content, consider using the iOS markup tools in combination with screen recording. You can start a screen recording, then use the markup tools to draw on the screen, highlight important areas, or add text annotations in real-time.
Lastly, if you’re recording a long session, be mindful of your iPhone’s storage space and battery life. Screen recording can use up battery quickly and generate large video files. Consider connecting to a power source for extended recording sessions, and make sure you have enough free space on your device before you begin.